Wednesday, June 17, 2015

Bouncing Ball!

Today I will be changing this code (by Seb Lee-Delisle on Open Processing) This code prints a program that has a ball bouncing and its speed and height changes realistically like a ball.  

The first thing we are going to do is clean up the code and change the double slashes (//) to pound signs (#) Now we are going to change void setup(){} and void draw(){} to def setup (): and def draw (): and delete all the semi colons and curly brackets. Next we are going to add colons after all the if statements. Next we are going to delete the word float every time it appears. Next we are going to delete the else form the last if statement. Now we are going to change  void mousePressed(): to if (mousePressed): Now we are going to change the double lines in this statement; if ((x > width - w) || (x <= 0)): to the word "or" Now we are going to add 
  global x 
  global y
  global w
  global h
  global speedY
  global speedX
under def draw (): 
Your code should look like this:


Your code should should successful print a program that shows a bouncing ball.


String of Random Circles!

Today I will be changing this program (by Cater Beeman/Karsten Weiss on Open Processing) to Python mode. 

As usual the first thing we will do is change void setup(){} and void draw(){} to def setup (): and def draw (): and get rid of all the semi colons (;) and all the curly brackets ({}) and add colons (:)next to all the if statements. Now get rid of the word float and the word break, as we do not need use these in this case in Python. So far your code should look like this:


Now we are going to get rid of the lines of code; switch(key) and case 'c': and instead put in  key.lowcase == "c" Your code will look like this: 

When you run it you should get a program that draws something like this (when you click and drag the mouse): 


Monday, June 15, 2015

Random Lines!

Today I will be converting this code (by Tara Milani on Open Processing) This code prints out a program that draws a bunch of lines or random sizes and colours all starting at the same point, its a very easy code.  All we have to do is change void setup() { } and void draw() { } to def setup (): and def draw (): and delete all the semi colons (;)  Your code will look like this:


Your program should draw random lines, looking something like this (but ever changing): 


Friday, June 12, 2015

combineCircular!

Today we will be converting this program by tara milani on open processing from java to python. This program uses math to draw a series of ellipse to make a pattern. 

As usual the first thing we will do is change void setup(){} and void draw(){} to def setup (): and def draw (): and get rid of all the semi colons ( ; ) Next we are going to get rid of the word float everywhere it appears, we d this because we do not need a float to declare a variable in python. So far your code should look like this:


 Now, right under def draw (): we are going to add global a (new line) global b (new line) global y (new line) global x We do this because in python when a variable is called in only looks for the variable under the draw function, but by adding global it knows to look outside the function. Your code should now look like this: 


Now you're done, your code should print out a program that draws a series of circles into a pattern. 


Thursday, June 11, 2015

Parabola!

In this tutorial I will be changing this code (made by 유창희 on open processing) to python from java. This code prints out a program that draws a parabola using math functions.   

First things first, we are going to change void setup(){} and void draw(){} to def setup (): and def draw (): Than delete all the semi colons and 
indent everything following our setup and draw functions. 
Than we are going to change float angle, y; to angle = 1. We do this because in
python we d not need to declare these as floats, we only need to set a value to angle. 
Than we are going to add global angle right under  def draw (): We do this because 
in python when we add angle into the math function it is only searching for angle in the 
def draw (): function, but by adding global angle it knows to look outside the function. 
So far your code should look like this:     


Than we are going to change the color codes for background and fill to RGB codes. background will be background(255,248,237) and fill will be fill(255,149,149)After that we change angle++ to angle+=1 Your code should look like this:  

When you run it you should get a program that draws a parabola and finishes like this:


DRAWING BALL!

I’m going to be changing the very simple code for this program (by Shipransh Agrawal on Open Processing) from Java to python. 
This code prints out a program that has a circle follow our mouse, so you can draw with it. This code uses mouseX and mouseY in place of the position for the circle, making it so the circle follows the x and y position of your mouse when you move it around. The code also makes it so the circle changes color in different shades of red.  
First things first lets change the set up and draw to the proper format for Python (def setup (): and def draw ():) Then we are going to delete the text following the double slashes, as these are comments we do not need. After that all we have to do is get rid o the semi colons. Your code should look like this:


Wednesday, June 10, 2015

If/else and True/False statements!

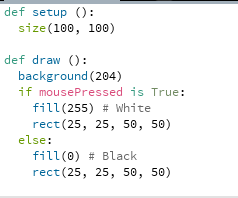
Today I will be showing you how to convert a example from here. The example we will be converting is this one:

First things first, let me explain what is happening in this program. This program contains an “if true or false” function. An “if true or false” function  means something will happen If something is happening else something else will. In this case if the mouse is clicked the box will turn white from black. 
The first thing we are going to do is change the void setup () { } and void draw () {} to def setup ():  and def draw (): Next we are going to get rid of all the semi colons because in Python we just do not need them. After that we must change all the double slashes (//) to pound signs (#) because the parts following are made into a comment but in Python // is the sign for division in a math problem. So far your code should look like this:

Next we are going to change the if  and else statements so they work on Python. To do this all we have to do is get rid of the curl brackets ( { } ) and replace them with a colon ( : ) After you do that your code should look like this: 

Next we are going to change the way our if true statement looks. All we have to do is change if (mousePressed == true): to if mousePressed is True: 
The final thing we need to do is move copy and paste our rect(25,25,50,50) directly underneath both fill functions . Your code should now look like this:


And when you run it you should get a 100 by 100 pixel sized screen with a 25 by 25 pixel black square that changes to white when you click your mouse.


MORE SHAPES!

Still following along with the same tutorial from the last project (this one) I will show you how to do the rectangle and triangle in Python mode. Remember, since we are doing it in python mode we must have def setup (): and def draw (): instead of void setup (): and void draw ():

Rectangle 
First we are going to make a program that prints out a rectangle. Our first step is to set up the screen size and background color under our def setup (): function. We will set our size to 500 by 400 pixels, I’m setting my background color to bright green but you may choose to play around with different colors. 
To draw our rectangle we must use the rect(a,b,c,dfunction. In the brackets next to rect we put our size and desired placement following these rules; a is where we put our x coordinate, b is where we put our y coordinate, c is where we put the length of our rectangle, and d is where we put the height. So if I wanted to have a red 60 by 80 pixel rectangle at 50 x and 70 y my code would look like this:


Feel free to play around with sizes, positions, and colors. 

Triangle
Now we will make a program that prints out a triangle. Follow the same setup and draw function as we have for rectangle as we will need to use this for everything. I am going to make my background purple and m triangle yellow. 
For a triangle we use the triangle(x1, y1, x2, y2, x3, y3) function. The rules for this function are x1 is the x-coordinate of the first point, y1 is the y-coordinate of the first point, x2 is the x-coordinate of the second point, y2 is the y-coordinate of the second point, x3 is the x-coordinate of the third point, and y3 is the y-coordinate of the third point. The size of our triangle will depend on how close together or how far apart we place our points. 
When my code looks like this:


My program looks like this:


Again, feel free to play around with colors, sizes, and positions. 


BASICS & CIRCLE


 I will be following along part with this tutorial but I will show you how to convert it from Java (the mode used in to the tutorial) to Python.  
So first things first, we’re going to open up Processing and make sure its in Python mode:


After we are sure its in Python we are going to add our set up and draw function. In the linked tutorial the maker puts void setup () and void draw () followed by curly brackets where he store all the code he wants to follow these commands. Since we are doing it in python mode these must look a little different. Our setup and draw functions will instead be def setup (): and def draw (): like this:


After our def setup ():  we will add all the things we want to happen once and once only, for example our desired screen size, and background color. After our def draw (): function we will put all the things we want to show up on our screen, for example shapes and their colors. I’m setting the screen size to 500 by 400 pixels and the background to light blue. In the tutorial he does his commands followed by a colon, we do not need to do this in Python. 
You will set the screen size by putting size(500,400) indented under your def setup(): function. You will set the background color (light blue, in this case) by putting background(194, 244, 255) indented under your def setup(): function. The numbers in the brackets next to background are RGB color code numbers for light blue, if you wish to make your background color different you can find more RGB codes here 
This is what your code should look like so far:

Now we are going to begin to add our shapes and playing with their colors. The shapes I will be doing today are circles (called ellipse in the code). Again, in the video tutorial linked he follows all lines of code with a colon, we do not need to do this. 
To make a circle we must put ellipse(250,200,150,150) indented under our def draw(): function. The number in brackets next to ellipse are the placement of the circle and the size, the placement of mine is 250 x and 200 y and the size is 150 by 150 pixels. To change the color of the stoke and fill of our ellipse we must add the stroke() and fill() command before our ellipse. I am going to make my stoke and fill both a dark purple. To do this we add the RGB color code to our brackets next to our stroke() and fill()command. 
Your code should now look like this:

And when you run your program it should look like this:


You have now successfully made a Python program that prints out a circle. Feel free to play around with the colors, sizes, and shapes position.